Find out how to execute actions after a delivery has been sent with Post-Processing in the Campaign, the Routing and the Service Provider!
📬🌍⚙️
Intro
There are 3 ways of handling any process after a delivery execution:
- Inside the Campaign Workflow
- With a Post-Processing workflow via the Routing External Account
- With a Post-Processing workflow Template via the Service Provider
Inside the Campaign Workflow
Add a Javascript Code activity after a delivery, with the following code:
logInfo('vars.deliveryId:', vars.deliveryId); // will display "vars.deliveryId: 999999"
var delivery = NLWS.nmsDelivery.load(vars.deliveryId);
logInfo('delivery.label:', delivery.label); // "My Delivery Label"
You may debug by activating the feature “Display the tasks and the log”:
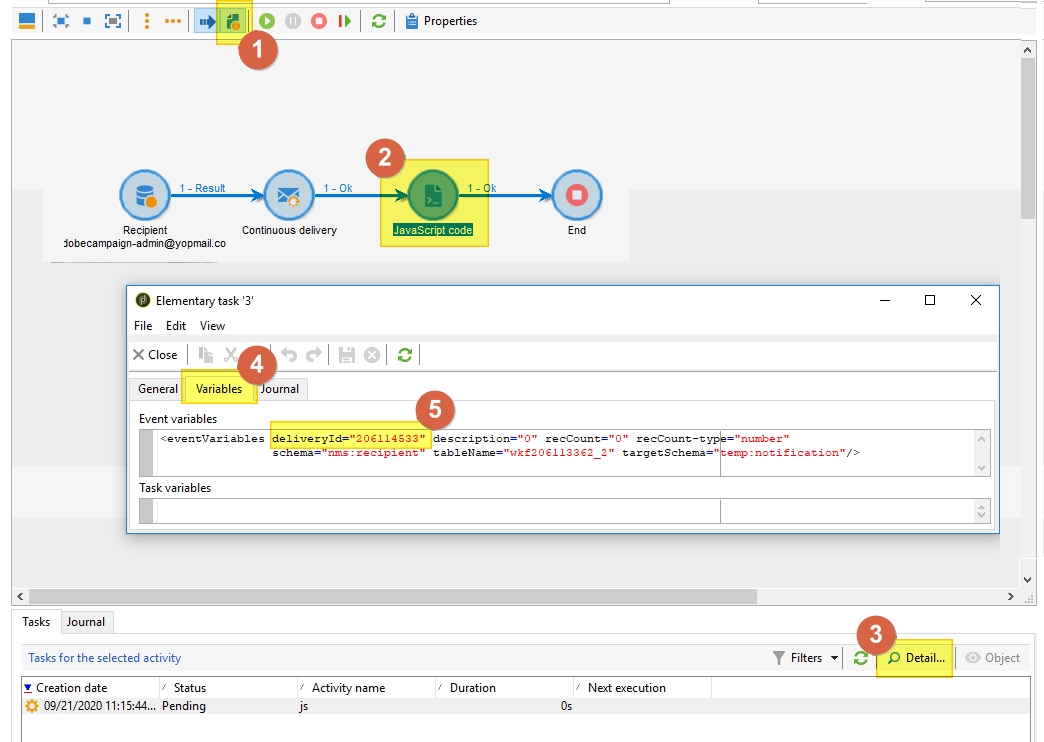
- Activate the option, it will bring up a new panel in the lower section of the Workflow, with 2 tabs: “Tasks” and “Journal”
- Select the activity that comes right after the delivery
- In the “Tasks” tab, make sure the first line is selected, and hit the “Detail” button
- Select the “Variables” tab
- You’ll find the XML version of the
varsvariable content, with thedeliveryIdattribute, hencevars.deliveryId
With a Post-Processing workflow via the Routing External Account
Instead of having code and process in a campaign (that should be kept simple), you may externalize your dev to a Post-Processing workflow.
To do so, follow the current steps:
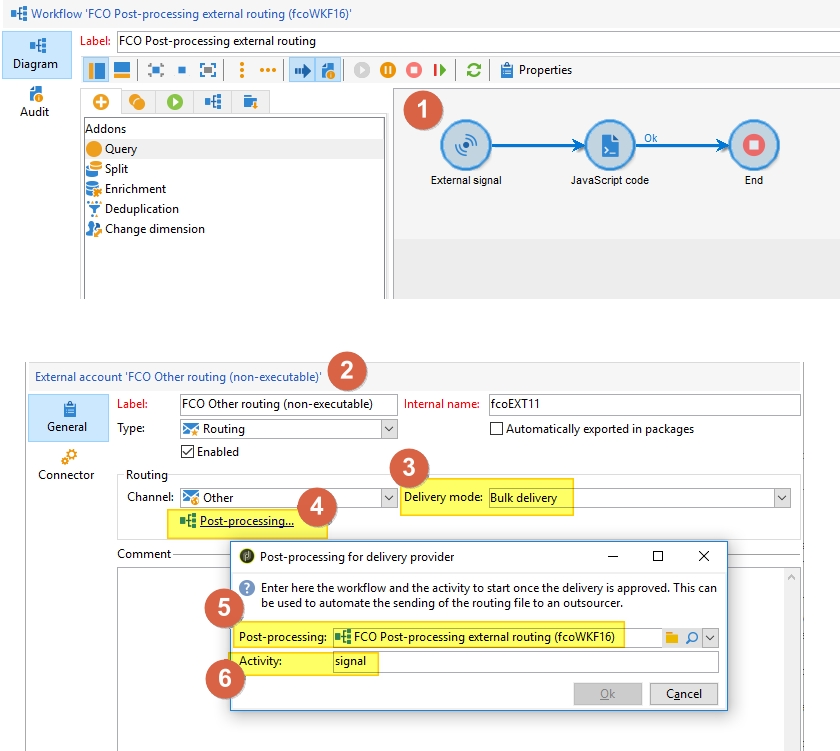
- Create an new workflow with a Signal activity called
signal, linked to JavaScript activity (use the same code as previous chapter), linked to an End activity. - Duplicate your delivery’s current routing (Administration > Platform > External Accounts (nms:ExtAccount)) and then from the delivery Properties > General > Routing
- Change the Routing’s Delivery mode to
ExternalorBulk Delivery, in order to reveal thePost-Processing...option - Select the workflow you created in #1 as the Post-Processing workflow
- Leave the activity name to
signal
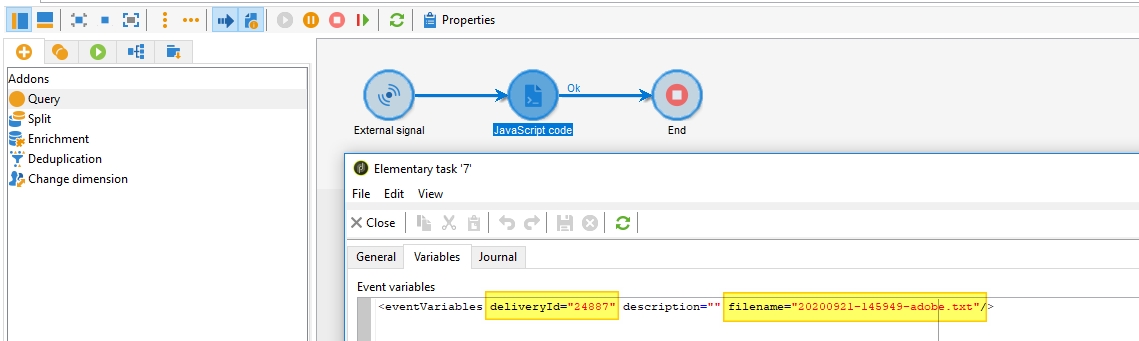
Start the workflow, launch your campaign/delivery and debug the workflow, like before. you’ll have the following variables in the eventVariables XML doc:
vars.deliveryId: the delivery idvars.descriptionvars.filename: the absolute or relative filepath of the generated delivery external file
NB: Using a standard delivery activity with “Send a Proof” works well with this solution.
You may also use standard activities such as a Query on nms:broadLogRcp where @delivery-id = $(vars/deliveryIs), linked to an Update data:

With a Post-Processing workflow Template via the Service Provider
If you’d like to save and keep each workflow execution separate, you have to use a Workflow Template referenced by the Delivery’s Service Provider. The workflow template is configured as follow:
- Create a new Workflow Template with a JavaScript activity and an End
- Duplicate your routing
- Remove the Post-Processing workflow (if any) from the routing
- Create a new Service Provider in Administration > Campaign Management > Service providers (nms:supplier)
- Create a new Service (nms:supplierModel) in the newly created Service Provider
- Link the workflow Template in Jobs > Post-Processing > Workflow template
- In the Delivery, link the Supplier via Properties > Advanced > Service Provider > Service
In the workflow template, the main difference is the variable name, you now have access to:
instance.vars.iDeliveryId: delivery idinstance.vars.iOperationId: campaign idinstance.vars.strFileName: the absolute or relative filepath of the generated delivery external file- No more Signal activity
Feel free to test with the below JavaScript code:
logInfo('instance.vars.iDeliveryId:', instance.vars.iDeliveryId);
logInfo('instance.vars.iOperationId:', instance.vars.iOperationId);
vars.filename = instance.vars.strFileName;
logInfo('vars.filename:', vars.filename);
instance.vars.isProof = NLWS.nmsDelivery.load(instance.vars.iDeliveryId).FCP;
logInfo('instance.vars.isProof:', instance.vars.isProof);
NB: Using a standard delivery activity with “Send a Proof” doesn’t work with this solution.
NB 2: the standard supplierMgt workflow must be up and running for the Service Post-Processing workflow to be executed (Source)